Kodak Aerochrome — a Colour IR Film Guide & Review
“The Most Expensive Film Money Can Buy!” 💸
18 min read by Dmitri.Published on . Updated on .

Kodak Aerochrome is the only film of its kind— a false-colour infrared. This emulsion has been out of production for over a decade, yet it’s still high in demand: as of this writing, a 24exp. 35mm film canister may cost you north of $250 or over $10 per frame. The price goes up for larger formats.
The Aerochrome look is not for everyone, but it has its fans — including Jason Kummerfeldt/grainydays, who mentions the film at the beginning of every video in front of his 250K+ YouTube subscribers.
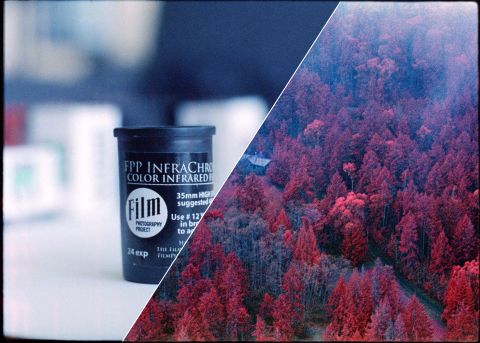
My interest in Aerochrome began when the Film Photography Store sold it in FPP InfraChrome-branded canister a few years back. I didn’t find the results appealing at first: this film is difficult to meter and difficult to edit. It has a narrow dynamic range, unexpected response to light, and harsh grain.
It’s easy to ruin Aerochrome.
But when used deliberately and with a creative (or even scientific) intent, this film can produce incredible results.
And so, in addition to the detailed review of the emulsion, I’ll be sharing a few tips for getting the most out of Aerocrhome in this article. If you’ve got a roll or planning to buy some for a special occasion, this article is for you. If not: stick around for the eye candy and a list of alternative ways to create images like the ones you see here.
☝︎ Further reading: “‘Greenscaling’ Aerochrome” — an article (with samples) that describe the world’s first attempt to redscale this colour infrared film!Recommendation not found.In this article: What is Kodak Aerochrome? A brief history of Aerochrome. Kodak Aerochrome resolution and dynamic range. Developing Aerochrome. Metering Aerochrome (exposure guide). Handling Kodak Aerochrome. Lens filters for Kodak Aerochrome. Focusing on infrared with Aerochrome. What to shoot on Aerochrome film? Scanning and post-processing Aerochrome film. Printing Aerochrome. Aerochrome alternatives. Where to find Aerochrome film today. Support this blog & get premium features with GOLD memberships!
✪ Note: Are you reading this article on a mobile device? Switch to landscape view for higher-res images and consider turning off the Night Shift (iOS) or Night Light (Android) modes — for better red colour separation.
What is Kodak Aerochrome?
Kodak Aerochrome is a series of film emulsions that are sensitive to near-infrared light. It was manufactured by Kodak between 1942 and 2009.
Near-infrared (up to 900nm) light-sensitive film is not a heat or night vision system. Those sorts of devices require a sensitivity for 9,000–14,000nm wavelengths or an external infrared “flashlight.” However, IR film is very good at sensing reflected infrared light, which plants provide plentifully, thanks to the Wood effect.
Aerochrome’s original purpose was the detection of vegetation health, where cleared trees or objects painted green would stand out from the red sea of canopies. The military, which contracted its initial development, used Aerochrome to seek out camouflaged enemy bases, whereas forestry departments used the film to examine the state of their ranges.
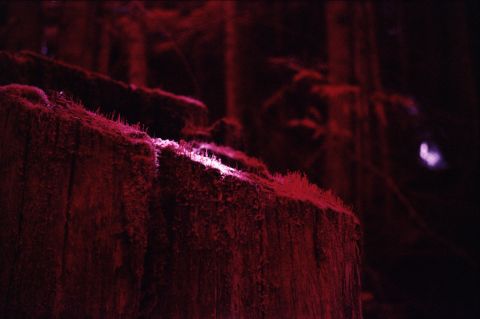
Unfortunately, all modern infrared films (i.e., Ilford SFX and Rollei Infrared) are black-and-white, making Aerochrome an exception; indeed, it is an exceptionally wild-looking emulsion:
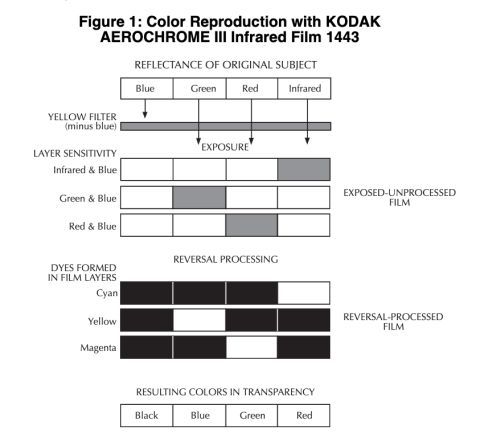
The starkly devilish pink, red, and brown hues painted by Aerochrome are activated by near-infrared radiation instead of simply appearing white, as they would on monochrome films. Other colours are also affected; visible reds become green or yellow, greens may turn purple or blue, and yellows become white. You may also notice that the clouds, the sky, water, and even transparent glass behave oddly on this stock — they may become dark blue, black, orange, green, or grey (depending on the filter you use with this film).
A brief history of Aerochrome.
Even though this film was developed for professional and military applications, Aerochrome quickly found its way into consumers’ hands around the 1960s as Kodak EIR.
One famous example of its usage was Jimi Hendrix’ album cover for “Are You Experienced?” where his band was portrayed on a fish-eye lens with Aerochrome. Frank Zappa did one too, and so have many others.
Eventually, the film trickled into many graphics departments and photographers’ pockets, seeking an out-worldly effect. However, its popularity was doomed to fade as its limited application, and its (often gimmicky) results soon fell out of popular favour. Professional and military tools had long switched to digital equipment, and by the late ‘00s, there was no reason for Kodak to make any more of this film.
Just before the film was discontinued in 2009, Dean Bennici acquired a huge cache of Aerochrome. He got uncut emulsion sheets in hopes of cutting and distributing them to the photo community. Richard Mosse got 16mm movie reels from Dean for his art-documentary series covering armed conflict in the Democratic Republic of Congo.
Whatever you find for sale today is an old cache — either from Dean’s stash or from old rolls kept before discontinuation.
Kodak Aerochrome resolution and dynamic range.
Aerochrome grain is chunky. One of the datasheets for the film (revised by Kodak sometime in November 2005) lists fine grain as one of the film’s properties; though it may have been the case at some point, it doesn’t appear as such in most photos I’ve seen and taken. This may be due to the cross-processing that this film must undergo or due to its age.
Aerochrome’s severely limited dynamic range is its most challenging attribute. Aerochrome does not tolerate exposure mistakes and may not look good in high-contrast light, such as noon sunlight. This makes exposure and scene selection particularly challenging as sunlight is the best source of IR radiation needed to activate the characteristic Aerochrome red.
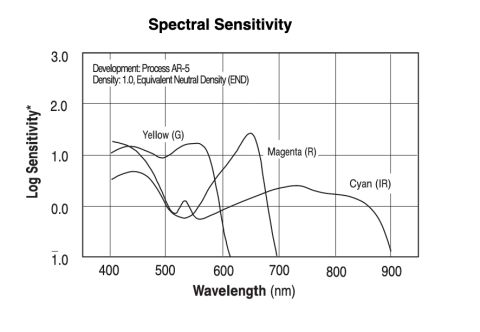
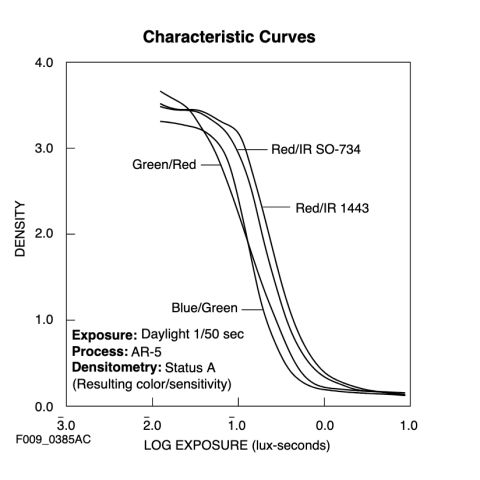
Aerochrome’s characteristic curve shows about 0.8 lux-seconds of useful exposure when processed in AR-5 chemicals. This converts to about 3 stops of dynamic range. This is less exposure latitude than with Fujifilm Provia 100F — a notoriously contrasty reversal film.
Compared to the likes of Kodak Portra 400 with 12 stops of dynamic range, three stops is not enough. Shadows are quickly crushed, and highlights are blown instantly should they be a little dimmer or slightly brighter than Aerochrome’s ultra-sensitive tolerance.
Developing Aerochrome.
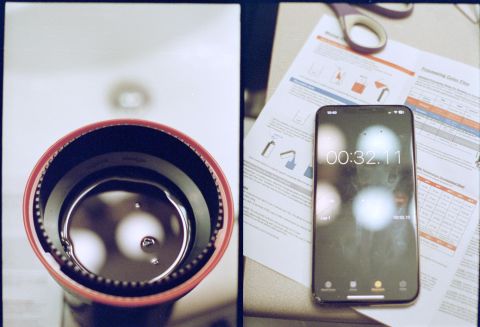
Kodak recommends developing Aerochrome using the AR-5 colour reversal process, which yields positive (slide) film. Unfortunately, this process requires a pro lab space, specific chemicals, and temperatures of 48℃.
Those who have processed Aerochrome in AR-5 claim better detail and finer grain than with C-41.
It’s possible to develop Aerochrome in E-6 — a standard reversal/slide process. However, out of the easily accessible options, C-41 is still probably the best route for print and digital scans.
Positive slides can look beautiful, but for optimal results, you may want precise control over the colour that you can’t correct on a physical emulsion and a larger physical area if you want to display it. Still, the E-6 may be worth a try in any configuration, just to see how it looks in hand.
Metering Aerochrome (exposure guide).
If you choose to develop your Aerochrome film in C-41, you may want to rate it at ISO 320 for more shadow detail. But for E-6, shoot it at ISO 400 to preserve highlights.
✪ Note: Some Kodak Aerochrome/EIR versions may have different box speed ratings.
Of course, you will need to take your filter into account, and thus, if your camera does not have through-the-lens (TTL) metering, you’re using a hand-held meter or following the Sunny 16 rule. Filter manufacturers often list the filter factor value that can be used to subtract stops of light sensitivity from the film’s ISO. Alternatively, you can place your filter directly in front of your light meter to get an updated value.
For example, my 133/26 Gr1 Green filter for Voigtländer Vitessa cuts light by about one stop. This means that if I plan to develop my Aerochrome as a slide film with the sensitivity of ISO 400, I will now need to assume it’s an ISO 200 film with that filter. Or, if I expect to develop it in C-41 as a colour-negative film, it has a slightly lower ISO 160 sensitivity.
Your scene selection (discussed in further detail below) is critical for correct exposures. If the skies are clear and the sun is bright, avoid harsh shadows. Some of the best images taken with this film in this kind of light are of sweeping natural landscapes where shadows under the canopies are not visible, and there’s very little brightness variation.
Another thing to watch for when shooting Aerochrome in full sun is lens flaring. I’ve gotten a few images where the light got into my lens at such an angle that the entire frame got a strong red cast. Though my scans allowed me to remove most of it, it would’ve looked significantly better without the flaring. And so, you may want to pay particular attention to the direction of the sun and ensure that you aren’t shooting against it or at an angle such that it shines from the side — simply put, shoot with the sun behind you and use a lens hood.
Cloudy/overcast days make exposing Aerochrome much easier. Though you may not get the dramatic cobalt colours in your skies (they will appear grey or azure, depending on a filter), there’s a lot less difference between highlights and shadows in this light.
Handling Kodak Aerochrome.
Despite its unique sensitivity to IR light, Aerochrome isn’t any more susceptible to fogging from X-ray machines. But if you plan to take it through an airport, you should try to get it hand-checked (read more details about travelling with film).
Film Photography Store recommends their FPP-branded Aerochrome be used in mechanical cameras only. They explain the danger of the hand-fastened film tearing off the spool via the electrical motor and fogging from IR lamps in some cameras meant for counting frames.
I’ve shot mine in Voigtländer Vitessa cameras and through Hasselblad XPan. Vitessa is a fully mechanical camera; even then, I took particular care near the last frame not to wind the film too hard. XPan, on the other hand, was an expensive experiment that (thankfully) yielded some good results. The emulsion did not get torn, and there was no fogging. It’s possible that my version of XPan was from a production run for which Hasselblad allegedly fixed the IR fogging issue (and it should not be a problem on XPan II). Of course, I can’t promise that using such a camera won’t waste your precious Aerochrome — careful use with a mechanical camera is your best strategy.
Your lens optics may play a significant role in the quality of the results you’ll get with this film. Flaring can manifest severely on Aerochrome — thus, a lens hood and good lens and filter coatings are recommended.
If you’re keeping your Aerochrome in a freezer, let it warm up in the fridge for an hour and another 30 minutes at room temperature. This should help alleviate reticulation and other issues caused by condensation.
It’s also best to keep your Aerochrome film roll in subdued light at all times — including loading and unloading. This will help you avoid potential light leaks.
Lens filters for Kodak Aerochrome.
Aerochrome does not work without a lens filter. The characteristic red glow fades to black without one. However, you aren’t limited to Kodak’s recommended Wratten #12 or Y52 (yellow) filters. The colours you get will depend on the density of your filter and its hue.
I’ve got decent results with orange, various yellows, and even green filters. While your filter choice may not match the ones I’ve used exactly, the sample images below should give you some idea of what to expect with this film.
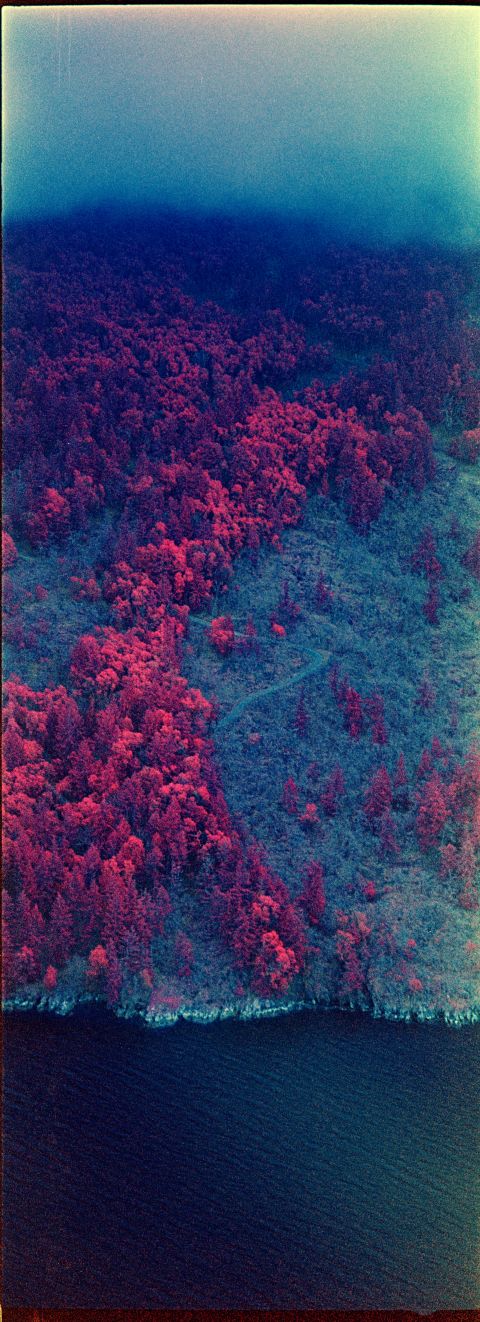
Above: Kodak Aerochrome with Flic Film Yellow (identical to Tiffen Yellow ). This filter gave the best results overall, with the red hues mixing in with blues and purples to create the cotton candy textures.
Above: Kodak Aerochrome with 85C Warming filter for Voigtländer Vitessa. This filter created a mild Wood effect in my images, although it still proved creatively interesting.
85C is intended for shooting tungsten-balanced film, like CineStill 800T, in daylight . Turns out that it also works well with Aerochrome.
A few more examples of various filter effects with Aerochrome can be found in this article.
✪ Note: Red filters (especially IR filters) are not recommended for use with Aerochrome. The majority of light-sensitive layers in this film react to visible light and thus should be taken into account.
Focusing on infrared with Aerochrome.
Whereas black-and-white IR films will have you shift the focus slightly with each shot to ensure that the near-infrared light is sharp (as it’s longer than visible radiation’s wavelength affects your lens’ focal length), Aerochrome does not require any focus adjustments.
Most of the radiation that Aerochrome absorbs is within the visible light spectrum, which makes it behave like any regular colour emulsion (focus-wise).

What to shoot on Aerochrome film?
Aerochrome needs evenly lit scenes with the sun away from the lens (as discussed in the exposure guide above). Of course, the contents of those scenes play an essential role in the effect you’ll get with this film.
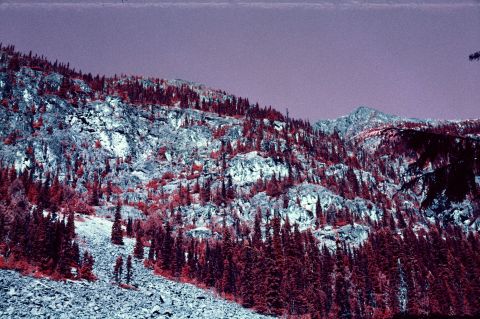
Naturally, the Wood effect dominates Aerochrome photography. All leaves, when properly lit, glow red — less so if they are sick or dead. But not all vegetation looks the same: “[H]ealthy deciduous trees have a much higher infrared reflectivity than healthy evergreens,” according to the Aerochrome datasheet; thus, you can expect various pines to produce a lesser effect than, say, palm trees. You may also notice that grass will show a bluer hue of red, and flowers will appear white or yellow.
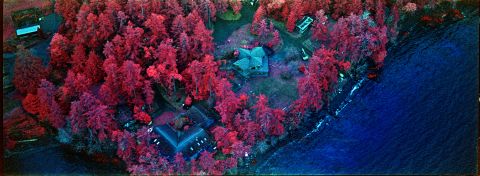
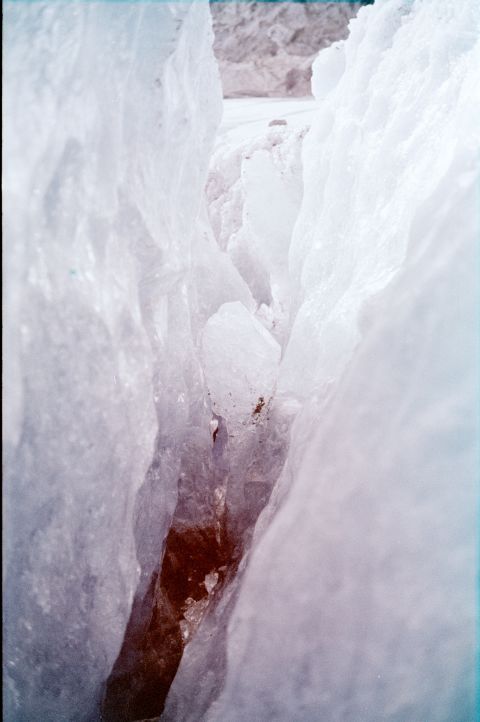
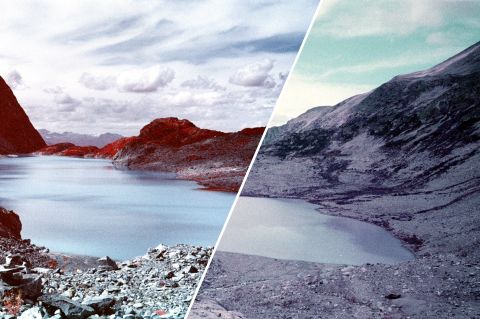
“Because of its low reflectance to infrared radiation, water appears very dark, and the ice appears light” on Aerochrome. Algae and any vegetation in the water may also glow red.
Your dark-skinned subjects will look relatively natural on Aerochrome. But light-skinned subjects may get a yellow, green, or turquoise tint. Additionally, many types of clothing will glow red — depending on the material.
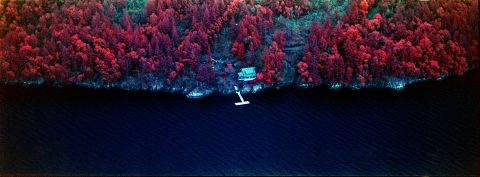
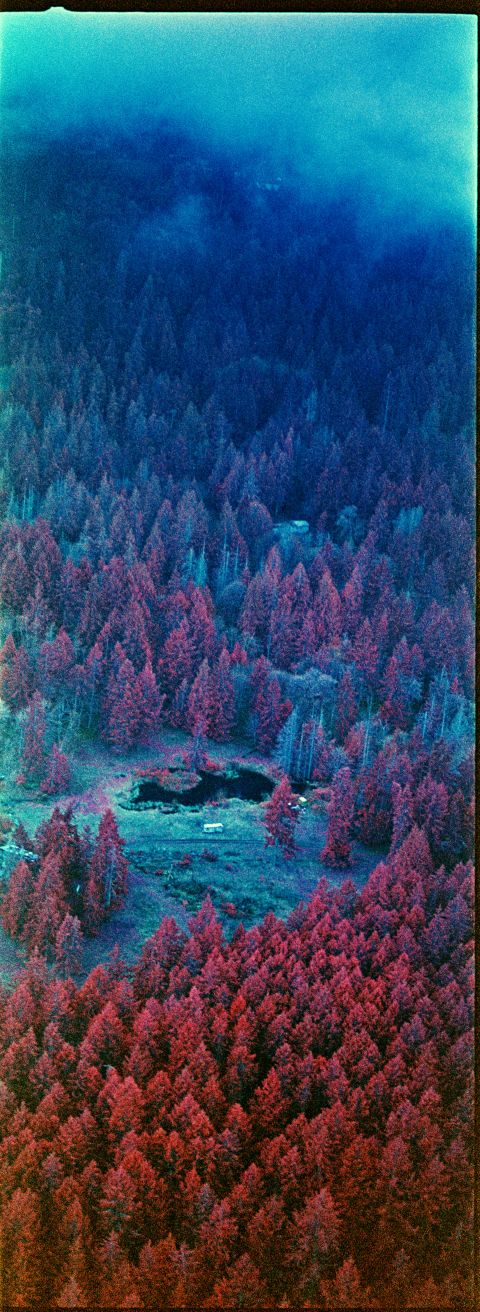
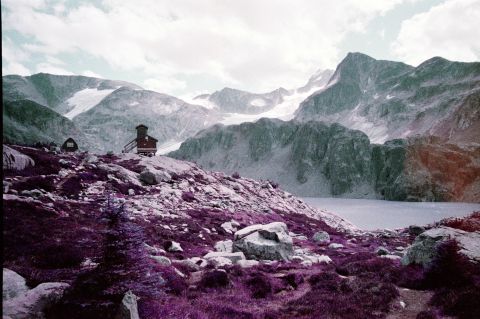
Some of my favourite images shot on Aerochrome are taken from a plane or a high-up viewpoint overlooking mountainous forests. In these conditions, the lighting is often sufficiently even, there are few distractions within the frame, and the film is given an opportunity to picture things the human eye can’t see. Whether deliberately or unintentionally, every photograph of this sort is a wilderness health survey.
Note that haze can manifest in Aerochrome frames. Though infrared radiation has no problems penetrating some fogginess, the film’s blue colour layers will pick it up and may wash out some of the characteristic red glow at large distances.
Scanning and post-processing Aerochrome film.
Aerochrome is an expensive and challenging film to shoot. Thankfully, it responds very well to digital post-processing. So if you’ve got a quality, high-resolution scan (better yet, a digital negative), altering its colours and contrast will not significantly decrease resolution.
However, knowing how grainy this film is, you may not want to apply digital sharpening as it will make it look even more coarse. This, of course, is less of an issue on larger format scans.
I’ve been using PrimeFilm XAs for my 35mm Aerochrome slides and negatives with equal success. This film does not have an orange mask, and thus if you develop it in C-41, the inversion quality may be better using the method described here.
✪ Note: I use this method to scan all film for my reviews. It creates consistent results that make understanding and comparing the emulsion’s colour/contrast attributes possible.
Printing Aerochrome.
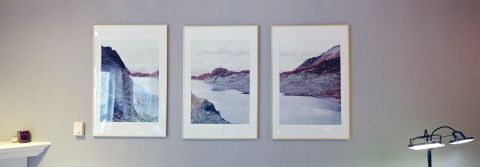
Aerochrome is a grainy false-colour film.
This film is not a high-resolution emulsion; I wouldn’t expect impeccable detail on large prints from 35mm — even if you have a fantastic lens. Much the same, medium-format shots may look crunchy with Aerochrome.
Nevertheless, I enjoy grain close-ups, so I made a triptych (above) with about 150DPI print resolution from a 34MP scan. This was enough to hide pixelation at all distances.
The high contrast colours of Aerochrome make it easy to print (it’s legible even with poor ink and paper quality). And so does the false-colour nature of the renderings: there’s no colour accuracy to worry about as the entire look is interpretive — although you may want to print a few test swatches before running the big job to fine-tune it to your preferences.
Printing Aerochrome negatives developed in C-41 is also possible in a darkroom with colour papers and RA-4 chemicals.
Aerochrome alternatives.
Aerochrome is very expensive, and the costs are going up by nearly 100% a year as the stocks inevitably diminish.
Perhaps there are ways to get the same effect (after all, we’re living in the age of machine learning models drawing images from text descriptions)? Indeed, here are a few alternative ways to get a similar visual effect:
1. Colour-shift green channel digitally. You can do this with Photoshop by making a few tweaks in the Color Balance adjustment layer. However, the results created using this method won’t be accurate and are difficult to make attractive.
2. Shoot Lomography’s Lomochrome Purple. This method is comparable to #1 as the emulsion you’d be using introduces colour shifts within the layers of the film.
Lomochrome Purple isn’t sensitive to infrared light; it won’t reproduce the Wood effect that makes Aerochrome so appealing (and scientifically informative). However, the colours that you’ll get using this film will likely look better than with #1, and they are much easier to achieve: scanning and inverting the negative does the trick.
There’s more to compare between Aerocrhome vs. Lomocrhome Purple (i.e., exposure, developing, scanning) — all of which I cover in my “Shooting Kodak Aerochrome vs. Lomochrome Purple” article.
3. Shoot with a full-spectrum digital camera and a filter. Digital cameras can be modified for around $100-$400 (depending on the camera model) to obtain sensitivity for infrared light. With a special filter ($60+), you should be able to get results remarkably close to Aerochrome.
The film can still be found at a price comparable to the cost of conversion and a filter. And it doesn’t require a donor digital camera.
4. Shoot trichromes. Black-and-white infrared film, such as Ilford SFX and Rollei Infrared, is readily available and affordable. With those films, you can recreate the Aerochrome effect with a blue and an IR filter — along with a tripod and a scene void of motion. You’ll need to take three exposures (one plain, one with blue filter, and one with Hoya R-72 IR filter) and then combine them in Photoshop.
Trichromes can be shot on film or digitally (with a full-spectrum camera). IR film requires no camera modifications and thus can give good results that compare well against Aerochrome. Although even the slightest bit of motion can introduce blurring and banding (and many additional steps are involved).
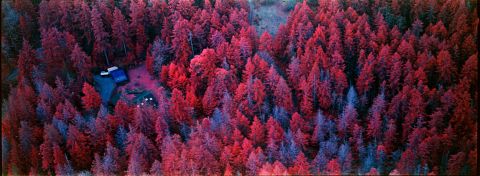
A picture like the one below, taken on Aerochrome film out of a moving plane, would be impossible with the trichrome method:
Where to find Aerochrome film today.
Virtually all Aerochrome that you can find today is sold on eBay. Having been last manufactured at least a decade ago, it is undoubtedly expired. Nevertheless, my rolls showed no fogging or significant issues.
Whenever shopping for Aerochrome online, check your seller’s reputation, ratings, and reviews. Knowing that your film was stored in a fridge or a freezer may be an asset but not necessary: Aerochrome is not the kind of film that will reveal colour shifts easily.
My brand of Aerochrome is FPP InfraChrome — which was cut hand-spooled from the military/professional supply cache during the past five years. It all still works, and I expect it to remain usable for the next ten years.
❤ By the way: Please consider making your Kodak Aerochrome film purchase using this link so that this website may get a small percentage of that sale — at no extra charge for you — thanks!