Scanning 35mm Film With PrimeFilm XAs
Review & Comparison to Flatbeds, DSLRs; Plus: Scanning Workflows and Ideas
15 min read by Dmitri.Published on . Updated on .
Pacific Image PrimeFilm XAs Super Edition might be your best choice for a dedicated 35mm film scanner in 2021. I found it to have a better value than most labs, flatbeds, other dedicated scanners, and DSLRs. PrimeFilm isn’t fault-free, of course, and the process of scanning film optimally isn’t straightforward.
In this article, I will be sharing my learnings from the two years I’ve spent with PrimeFilm XA, including my understanding of how it compares to other methods and how to make the best use of it.
I will also talk about scanning software. Primarily SilverFast, which comes with XA, and VueScan, which I recommend using instead.
PrimeFilm XA vs the lab: is it worth the investment?
Despite the shoddy build quality, PrimeFilm offers features not found in any other scanner within the same price range, like the built-in film transport, 137MP image files, and 48-bit colour.
PrimeFilm XAs currently sells for about $700.
Your lab may charge you anywhere between $5 and $30+. My shooting rate is currently about four rolls per month or about $50 on top of what I’d pay for processing at a mediocre scan quality. At that rate, the scanner should pay for itself within a year while providing superior scans.
After two years, my PrimeFilm scanner is starting to show wear. There are times when it would refuse to work, and I’d have to power it off and wait a few minutes. Its film transport started acting strange, and it makes strange noises. Still, there are no effects on image quality, so I plan to use it until it stops completely.
Despite the shoddy build quality, PrimeFilm offers features not found in any other scanner within the same price range, like the built-in film transport, 137MP image files, and 48-bit colour.
Owning a scanner has already saved me close to a thousand dollars and offered flexibility, resolution, and quality no lab in my city could. The catch is a few extra hours per month in front of a computer.
PrimeFilm XA vs. flatbeds vs. DSLRs.
Format. PrimeFilm XA can only scan 35mm film strips or framed slides in 3:2 format; no panoramas (unless you’re planning to stitch them), half-frames are OK. Flatbed scanners can theoretically scan anything, so can digital cameras, provided you have the right accessories.
Speed. Dedicated film scanners and flatbeds take a long time to inch through each frame, with the highest-res setting taking up to five minutes per piece. A DSLR with a macro lens, stand, and film holder can create a digital negative under a second. However, you must also consider the setup time and the additional complexities of having to invert colours on your own.
Frame borders. Adding a bit of a film border to the image may give an aesthetic you desire, ensure that you’ve got 100% of your image digitized, or “prove” to your viewers that you haven’t cropped your shot. Whatever the reason may be, PrimeFilm is likely to disappoint when it comes to this. The best I could get is a sliver of an unexposed film on one or two sides, but nothing more. Most flatbed scanners (i.e. flatbed film holders) won’t leave any borders either unless you place your negative straight on the glass, which will leave you with Newton rings. DSLR and drum are the only methods that can reliably get you those borders, even sprocket holes.
Feeding the film. A flat, dust-free film needs to be suspended in air or specialized oil to be scanned properly. DSLRs require film holders to keep your emulsion distortion-free in place. Most of the ones I’ve seen are relatively easy to use and allow you to go through the entire roll without having to cut it. Flatbed scanners are perhaps the most annoying in this aspect as every five frames will have to be precision cut, carefully maneuvered into the plastic casing and placed under the glass. You will then likely have to tell your scanner which frames to scan first, next, and so forth. Most dedicated 35mm film scanners will force you to do the same, save some part of the hassle. Thankfully, PrimeFilm lets you feed your film directly into the scanner with an option to batch scan the entire roll at once — though I do not recommend doing that. You can even scan mounted 35mm slides with PrimeFilm.
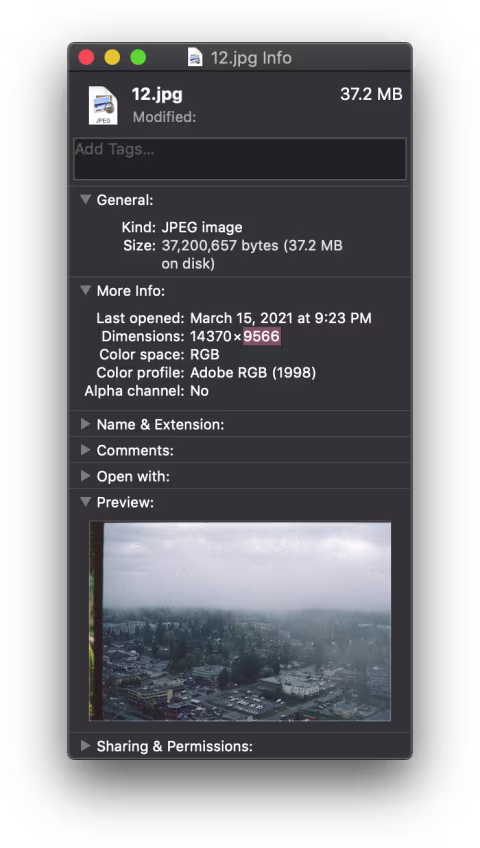
Scan resolution. PrimeFilm XA maxes out at 10,000DPI “ultra-resolution”, which can yield 137-megapixel scans, or images measuring about 14,370 by 9,566 pixels. The optical resolution of this scanner is quoted at 5000 ✕ 10,000DPI by Taiwantrade.com. This means that in “ultra-resolution” mode, PrimeFilm XAs will create an interpolated scan that will have a high 10K DPI resolution in one of its dimensions — this way you are still getting about 50% more information out of your image than with a 5K DPI.
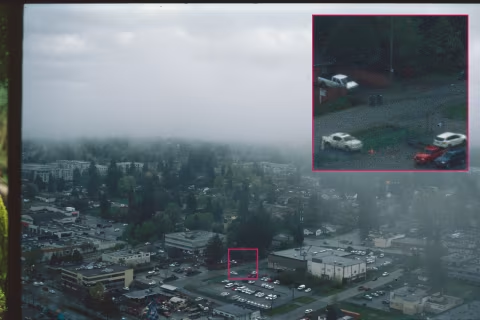
Most digital cameras today create 20~40-megapixel images, which are dramatically less pixel-dense. XA’s resolution is comparable to drum scans, though the number alone won’t tell everything about the level of detail. No more than 20-30MP are usually considered actual image data (with some exceptions), grain permitting. Though, unlike a monotonous pixel grid, film grain can look interesting, telling, or fascinating, which isn’t bad to have as an option.
Dynamic range. PrimeFilm converts image data with Dmax 4.2 maximum film density into 48 bits per pixel plus 16 bits in the infrared channel. I found this to be enough for all of my digitizing needs. There were no issues getting virtually all tones out of my monochrome, colour, and slide film.
Focus. Scanners, just like DSLRs, have to focus on the surface. An overwhelming majority of them, however, do not give any control over the fact. PrimeFilm XA lets you choose your level of crunchiness. But the manual adjustments will have to be altered between different stocks as the thickness of emulsions varies.
Setup. Flatbeds are cumbersome; DSLR rigs are painful. Dedicated scanners like XA are reasonably easy to move around and require nothing other than a power source and a laptop nearby.
Sample scan file.
If you’re curious to see what the quality of an unaltered scan is like from PrimeFilm XA, you can download a sample. Note that I had to reduce its resolution to 1,400DPI to cut down its size to a reasonable 21MB image.
➜ Free Download: Sample uncompressed 48-bit 35mm Film Scan (TIFF)
You will be asked to sign up for a free account with Analog.Cafe. It comes with access to more downloadable guides, additional website features, and a monthly community newsletter.

Setting up workspace for scanning and archiving 35mm film with PrimeFilm XAs.
If you can’t handle your film by the edges without touching the emulsion, get nitrile gloves — don’t get cotton — it scratches film. For ultimate archival longevity, ensure there’s no finger oil, dust, or hair on the film negatives.
I recommend getting a set of archival acid-free sleeves that you can keep in a folder. The one linked above fits nicely into a folder. Note that you may not be able to fit the entire roll into a single page. I keep mine organized with masking tape at the top of each new roll with the date, film, and camera type. A single roll typically shares two pages with another one or two but that isn’t a problem because I mark it on all the pages and thus it’s easy to find a match if the pages are to ever fall out of the folder.
You will also need scissors to cut your film and a blower to get the dust off the negatives.
Once you got your archival method ready, you will need to make some space for your scanner. PrimeFilm accepts film on one side and pushes it to the other, which means that there needs to be additional space around your machine.
✪ Note: even though PrimeFilm XA is capable of scanning an uncut roll out of the box, I don’t recommend using that feature. It’s buggy and cumbersome.
Setting up the computer file system for your digital negative archive.
Unless you’re OK with just keeping lossy JPEGs, your scans may take as much, if not more space than RAW files from digital cameras. The number of such files swells pretty quickly over the years.
You may choose to keep the digital negatives (non-inverted copies for further processing) with your PrimeFilm XA deliberately or focus on archiving the final images. Given the size these images can have, you should also want to consider an external storage solution, whether it’s a cloud service like DropBox or a physical HDD.
☝︎Further reading: “The Best Resolution (DPI) for Scanning Film.”
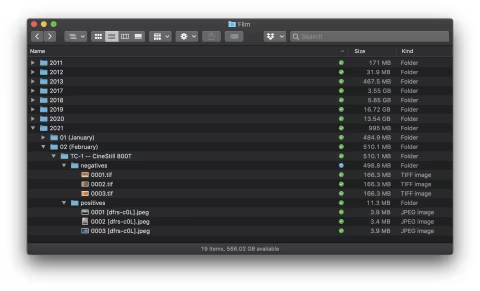
Organizing your folder structure is also important, while file names aren’t. I found that a pattern with the best balance between searchability and effort is:
YYYY » MM (Month) » Camera -- Film » negatives | positives
If you do not plan to keep digital negatives, you may keep your final results directly under the Camera -- Film folder. Whatever your method is, you will need to have a folder ready for your scans before you begin scanning.
☝︎Further reading: “How to Store & Organize Film & Film Scans” — useful advice for digital and physical film archival techniques.
Finding the right way to insert 35mm film into your scanner.
There are four ways to insert film into a scanner’s film holder: right side up/upside down and emulsion facing/away from the scanner lens.
The first choice is easy to make once you scan your first image. It’s also not particularly consequential to the results as it’s easy to flip images using software like Adobe Photoshop. It’s harder to spot mirrored images than the upside-down ones, but those, too, can be inverted. But what about the image quality?
I ran a few tests with my PrimeFilm XAs scanner at its maximum non-interpolated resolution (5,000DPI) and noticed some minimal differences at extreme close-ups. You may get a slight improvement in grain sharpness in most cases if you scan film with its emulsion side facing the scanner lens. This means that you should be looking at a mirrored image (where letters and numbers appear backwards) when inserting film into your dedicated film scanner.
However, with the differences this small, you might as well just save yourself the trouble and scan whichever way feels most comfortable. The controls on the scanner may feel more intuitive if you scan the emulsion side away from the scanner (so that the writing appears normal when looking at the film strip).
Selecting frames and operating film transport on PrimeFilm XA.
PrimeFilm XA can not detect frame edges. It relies on human assistance, from where it assumes a standard frame width when advancing the film strip.
To ensure that your first frame is positioned correctly, you may pre-scan it and make adjustments from thereon. However, a better way is to look into the little window directly at the negative to make sure that the edges line up. This way, you won’t need to wait for a scan to appear on your monitor. You will typically need to tap the ⏮ or ⏭ button so that the scanner lamp moves close to the film for better illumination.
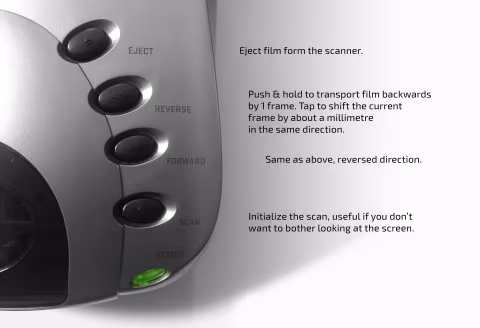
Tapping the physical ⏮ and ⏭ on PrimeFilm XA will move the film by about a millimetre in either direction. Holding those buttons down slightly longer before releasing will advance the film by about one frame. You can even initialize your ViewScan or SilverFast’s “Scan” command with the physical button, though I found it may cause issues in some cases.
You may also insert your framed slides into PrimeFilm XA’s slide film tray at the front.
Occasionally, there’s just one frame left from the strip, which PrimeFilm can not accept; this is when I insert the frame into a plastic slide frame I have handy and use the scanner’s slide frame tray.
SilverFast vs. ViewScan.
Getting photos out of digital cameras is as simple as downloading them onto your computer. To get an image out of a scanner, you will need scanner driver software meant to control the machine. But a digital negative, the scanned version of your film, isn’t very useful until it’s inverted; thus, a negative inversion software is needed to complete the steps.
PrimeFilm XA comes with SilverFast, which, like ViewScan, bundles both the driver and the inversion software into one package. Overall, I prefer SilverFast’s negative inversion tool as it generally manages to create better results, but the user interface SF delivers is horrid and confusing. After a year of dealing with it, I purchased a $100 ViewScan license with a much better UI.
Focusing on grain with PrimeFilm XA.
While most scanners have some sort of autofocus built-in, PrimeFilm XA is unique (in its price range) as it provides an interface to adjust it manually (it does have autofocus also). This is particularly useful as the “correct” focus level on film negatives can be a matter of personal choice. For example, early scanner manuals recommend avoiding showing grain by “smoothing it out” with the focus slightly off. Today, film photographers tend to favour sharpness and the grain’s unique appearance. Through manual focus, PrimeFilm XA can satisfy both of these preferences with the potential to create much sharper scans than a flatbed.
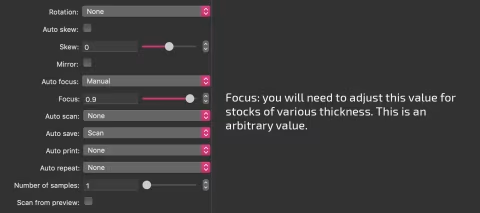
Note that if you use manual focus on your PrimeFilm XA, you may need to readjust it for different film stocks as they often vary in thickness.
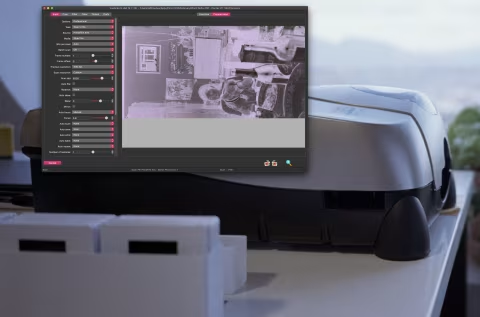
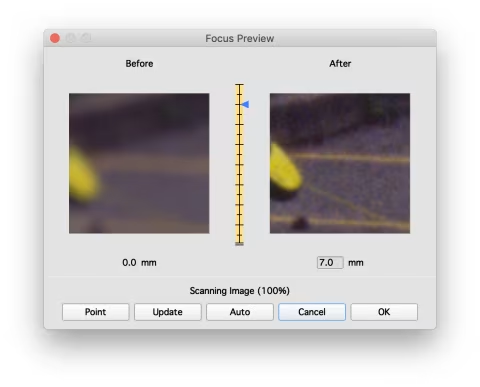
SilverFast makes film focus adjustment easy by letting you select a small patch to scan at 100% resolution and compare the results as you slide the distance control.
ViewScan does not have a convenient interface to control PrimeFilm focus adjustments. Instead, you will need to crop a small patch yourself and create multiple scans at different arbitrary focus values to determine what works best. In my experience, I found “1” to be sufficient for most C-41 films.
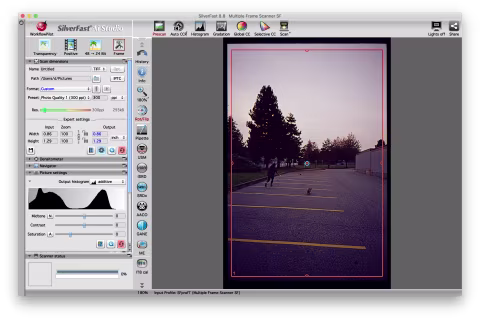
Scanning and processing film negatives with PrimeFilm XA using SilverFast and ViewScan.
Now that your focus is set, you’re ready to start scanning. Both ViewScan and SilverFast can scan, invert, and compress your files in shareable JPEGs. The default settings work OK though you may want to play around with the controls to get the result you seek.
While PrimeFilm may create and convert huge lossless TIFFs for you, I do not recommend doing that unless you’re saving them as digital negatives. You will quickly find that the space becomes scarce with 10+ GB per roll. The JPEGs are flexible enough to receive plenty of alterations without much banding or visible degradation.
Remember: if you need to print something huge, you can always rescan your physical negative.
Digital negatives.
The method of preserving digital negatives is an optional workflow that helps with better control over image inversion. However, this is an optional process for advanced use cases, not necessary for beginners.
Having spent two years with SilverFast and ViewScan, I’ve learned that neither software provides the control, consistency, and ease of use I’ve been hoping for. There is no “flat” or “minimally-altered” way to get an image from the negative as the inversion software is a computational black box that may work well for most images but not some.
To take back some control over the process, I’ve devised to scan every frame as a “slide” with zero curves or enhancements, which essentially creates a digital negative from every frame. Given that there’s no/minimal processing using this method, I can be reasonably confident that the scan is as close to the physical counterpart as possible.
I save the non-inverted flat scans as 5,000DPI TIFF files in the /positives folder. Because there’s a wide variety of inverting the negatives — be it by hand via Photoshop or through something like NegativeLab — I can now choose the best one or re-do without having to rescan an image.
So far, I’ve tried using Adobe Photoshop, NegativeLab Pro, ViewScan (yes, you can use it to invert digital files) and a “secret” tool I’ve built for my purposes. In each case, I got to keep the digital negative for further experimentation and spend the least time necessary dealing with bad scanner UI.

After two years of use, my PrimeFilm XA got sporadic film transport issues and occasional failures to transfer data. But despite its shotty build quality, there seems to be no better alternative for scanning 35mm film at home.
I may have to buy another once it stops working. Or see if I can afford a 30MP SLR with a macro lens, stand, holder, and light.
Where to buy your PrimeFilm XAs scanner.
This scanner is fairly popular and yet isn’t easily found in used condition. There isn’t much selection when it comes to these machines, but I found it useful to get new from a store with free shipping. I’ve got a link below that you can follow and support this blog with your purchase:
❤ Please consider making your PrimeFilm XAs film scanner purchase using this link so that this website may get a small percentage of that sale — at no extra charge for you — thanks!