The Redscale Film Guide
A Simple Analogue Technique for Styling Your Frames in Red + More Colours
7 min read by Dmitri.Published on . Updated on .

What is a redscale film?
Photographic film has two sides. Colour film has to be loaded with its emulsion side facing the lens to produce “correct” colours. This is often the only way to load a 35mm canister or medium format roll into a camera.
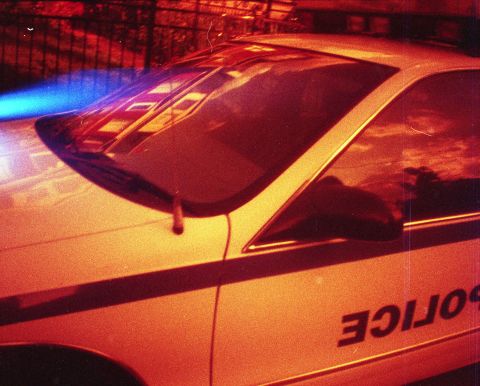
Redscale film is any colour film loaded with the emulsion side facing away from the lens. Redscale film usually creates darker, redder images compared to its “normal” use.
Redscaling requires a simple modification that can either be done at home or by the manufacturer.
This effect can be achieved with any colour photographic film, but it will not work with monochrome films.
Redscale is often used as an adjective, e.x., “Harman Red 125 is a redscale film.” It can also be used as a verb, e.x., “I redscaled my colour film to make moody Halloween photos.”
In this guide: What is a redscale film? How does redscale film work? Who makes or sells redscale film? How to make your own redscale film. Redscale film exposure guide. Redscaling unusual films for more unique effects. Support this blog & get premium features with GOLD memberships!Lomography Redscale XR box photo: Sgroey (edited).
How does redscale film work?
Redscale film shifts its colours to red because of how the layers are organized inside the strip.
Photographic film is made of multiple layers, three of which are typically responsible for reproducing the red, green, and blue hues of the visible spectrum. Those layers vary in their sensitivity to the light: blue is the least sensitive, and red is the most.
Those layers are usually arranged with the blue-sensitive layer facing toward the lens — thus receiving most of the light. The green-sensitive layer is behind it, receiving less light. The red-sensitive layer is at the back, receiving the least light.
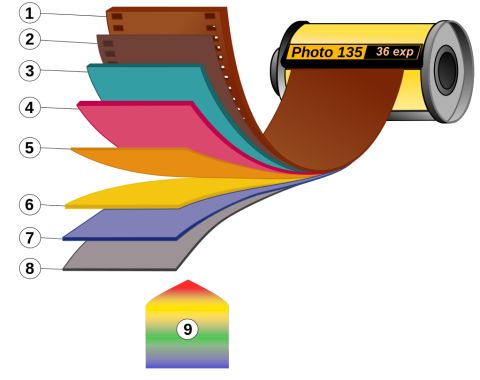
Manufacturers pay particular care to balance the layers’ sensitivities to create an accurate colour representation of reality. This is done by cranking up the red layer’s sensitivity to match the blue layer’s output. The result is, ideally, a naturally-looking picture.
When the film is redscaled or reversed so that the red-sensitive layer is now facing the lens and the blue-sensitive layer is at the back, it changes how the images look. The red layer, designed to be the most sensitive since it was at the back, is now at the front, receiving most of the light’s energy.
Meanwhile, the blue, being the least sensitive layer and furthest from the lens, becomes weaker. Its appearance is almost entirely limited to light leaks and strong over-exposures.
The green-sensitive layer is typically in the middle, so its proportion towards the rest of the image does not change drastically but is often still affected.

Who makes or sells redscale film?
You can buy redscale film from Lomography, Harman, KONO!, and a few small brands.
If you shoot 35mm film in point-and-shoot cameras, this can be a good option, as those brands will usually print an appropriate DX code for correct exposures, and in the case of Harman Red 125, the factory printed edge markings on the correct sides for full compatibility with minilab developers.
How to make your own redscale film.
If you have an empty 35mm undamaged film canister with a film stub out:

Cut the leader of your film straight and tape the now-straight edge of your colour film to the film stub sticking out from the donor (used) film canister so that its underside is facing upwards on the new (donor) film canister. Place both rolls in a dark changing bag or take them to a blacked-out bathroom and wind the film into the empty donor canister. Take your film out of the dark bag or your dark bathroom, and cut the film to separate them. Lastly, cut your redscaled film leader with scissors into a shape like your other 35mm film rolls so it fits in a camera (you don’t have to be very precise here).
If you don’t have an empty film canister:
The technique involves unrolling your film in the dark, cutting it, flipping it along the long edge, taping it back, and loading it into the canister. This task is not particularly difficult, but it may be tricky as it must be done in complete darkness.
Practice your movements before getting started. You want the film taped neatly and securely after you cut it. The best way is to wrap the tape around the film just once. You must ensure that no extra bits are hanging off the edges where you taped your film back together — otherwise, it will get stuck in the canister.
Start with a cheap film first. There’s a chance that things won’t work out.
Prepare your darkroom. You don’t need a professional space, just a bathroom with all the lights off. Do pay attention to any light coming into the room; I had to place a towel over the gaps in the door frame. Essentially, it needs to be pitch-black. Keep your tape and scissors handy so you don’t have to look for them.
⚠️ Redscaling medium format film at home can be difficult. Not only will you need to flip the film lengthwise, but you will also need to tape it to the exact starting spot on the backing paper as it was. The film curl can also cause a fat roll, riddling your frames with light leaks or rendering them useless. Be very careful and practice in daylight with a garbage roll.
Redscaling large format/sheet film is as easy as loading the sheets into your holders upside-down (with the notch facing the top-left of the bottom-right).
✪ Note: Shooting film that you redscale at home is best done with a manual film camera or one that lets you adjust the film’s ISO or change your exposure settings.
Redscale film exposure guide.
Photographic film contains numerous layers, not just the three colour ones. Once it’s flipped, it’s not just the colour balance that changes — the sensitivity of the emulsion will often decrease.
Usually, it’s enough to add a stop of light to the redscaled version of your film. For example, if you’re redscaling Kodak Gold 200, you should shoot it as an ISO 100 film.
However, there’s no specific rule for exposure adjustment, as each film may have a different structure. For example, if you’re redscaling a slide film or film with a clear base, you may not even need to change your exposure settings.
Redscaling unusual films for more unique effects.
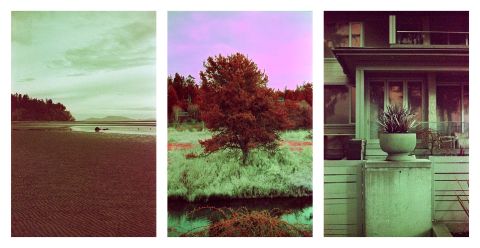
Most colour films will give you strong reds and virtually non-existent blues when redscaled. However, there are some options out there that can give you a very different colour effect.
For example, if you’re crazy enough to redscale Aerochrome (the most expensive film you can buy), your images will look mostly green, with the IR reds appearing in the same places as they would when shot normally.