How to Shoot CineStill 800T in Daylight
Make Better Photos With Tungsten-Balanced Colour Film
9 min read by Dmitri.Published on . Updated on .
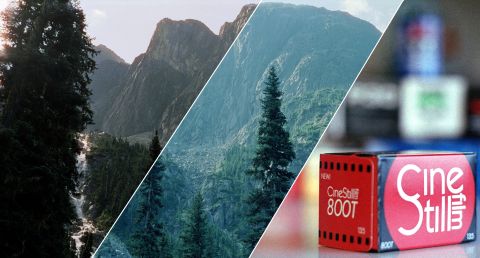
CineStill 800T sells out quickly — wherever I shop — making hunting it down an adventure each time. This remarkable emulsion is always in high demand, and it’s not just the hype: this film delivers for both perfectionists and experimental photographers.
In this article: Why shoot CineStill 800T in daylight? What happens when CineStill 800T is shot outdoors in daylight? Shooting CineStill 800T in daylight with and without 85C warming filter: an experiment. How to colour correct CineStill 800T shot in daylight after scanning. About white balance and colour temperature. Support this blog & get premium features with GOLD memberships!
☝︎ Further reading: “CineStill 800T Film Review.”
Why shoot CineStill 800T in daylight?
I use ISO 800 colour film to take pictures during my forest walks and with long lenses that I use handheld. Unfortunately, there aren’t many high-speed colour films left in production. Kodak Portra 800 and Lomography 800 are about the only options I could find today.
CineStill 800T is a great alternative to the few options we have. Based on Kodak Vision 3 500T movie stock, which CineStill cuts and repackages for still cameras, 800T offers an extended dynamic range along with very fine granularity.
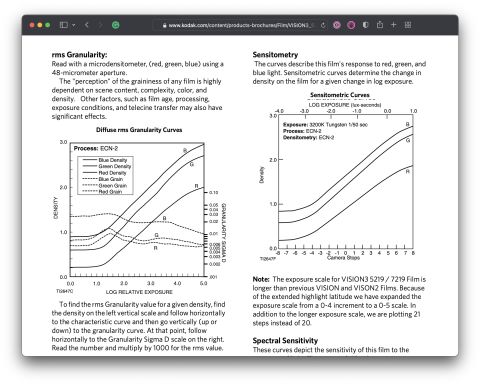
Kodak Vision 3 technical data sheet demonstrates how its grain behaves and illustrates the impressive 10+ stops of dynamic range:
The proprietary Sub-Micron Technology [that] enables 2 stops of extended highlight latitude, so you can follow the action into bright light-in a single shot-without worrying about blown-out details.
CineStill’s signature red halos around highlights due to the missing remjet layer are another something that neither Portra nor Lomography films have.
And of course, CineStill renders the colours and contrast in its own way (which I found to be precise, realistic, and appealing):
VISION3 500T Film has outstanding skin tones and color reproduction, while adding technical innovations that improve product performance and increase product versatility. The proprietary, advanced Dye Layering Technology (DLT) provides noticeably reduced grain in shadows, allowing you to pull out an amazing amount of shadow detail.
What happens when CineStill 800T is shot outdoors in daylight?
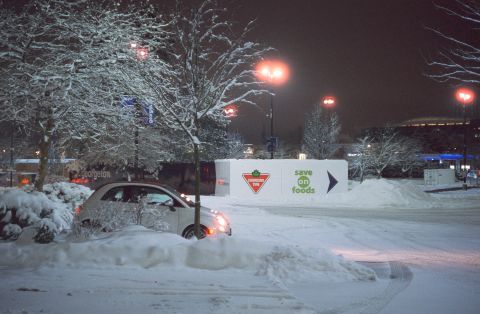
Typically, CineStill 800T shot in daylight without a filter would scan and print with its colours shifted towards light blue or teal. This can make for an interesting effect or appear undesirable.
There are, however, ways to control the colour cast that CineStill 800T produces when shot in daylight.
Shooting CineStill 800T in daylight with and without 85C warming filter: an experiment.
Using an 85C warming filter in front of your camera’s lens is arguably the best way to shoot CineStill 800T in daylight. It single-handedly converts your emulsion to daylight-balanced stock. In my experience, the filter required no exposure adjustments.
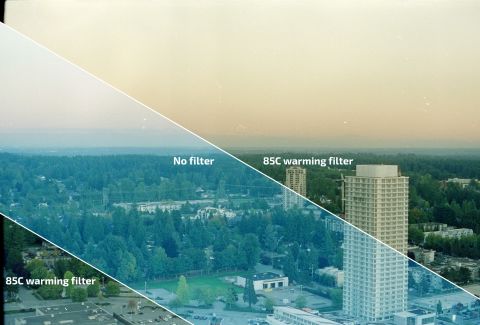
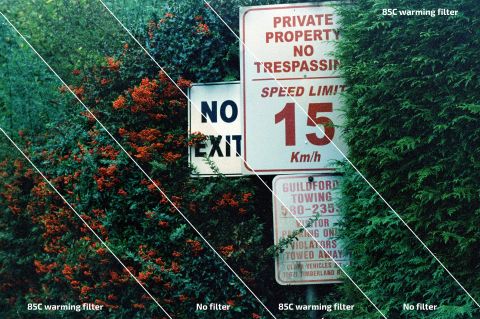
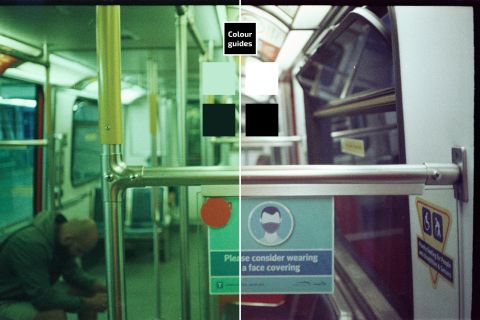
To illustrate how the 85C filter changes the colour balance, I shot each frame of my 35mm CineStill 800T roll twice: once with- and once without the filter. What you see here are composite images made with both frames (with and without an 85C filter) sliced and arranged next to each other for easy comparison.
I scanned the test roll with PrimeFilm XAs using the digital negative technique that ensured no unexpected automatic colour adjustments on top of the scanner data. I then converted the resulting negatives by inverting and normalizing the image data. This created predictable consistency in the scans.
All of the test shots were made with Vitessa A.
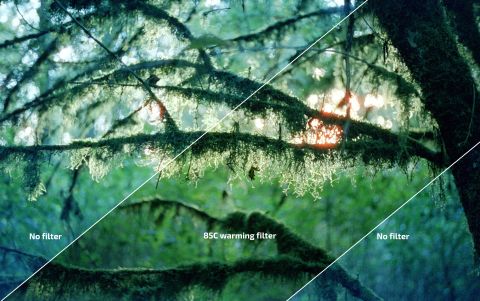
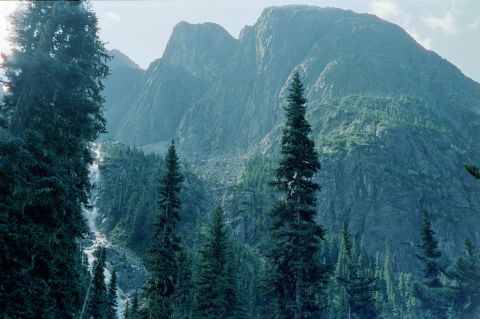
The difference in colour balance between shots taken with and without the filter depends on the time of day and the scene. I typically prefer results taken with the filter, but it’s not difficult to imagine that certain photographs may look their best with a bit of a teal colour cast.
Cool light (i.e., overcast weather) will produce more of a teal cast, whereas warm light (i.e., the golden hour during sunset or sunrise) will look better balanced. The cast is most noticeable on top of green and brown colours, less so on reds and blues.
While it is certainly possible to fix the photos taken without the filter using software, the job isn’t always simple or fast, as you will discover below.
How to colour correct CineStill 800T shot in daylight after scanning.
If you don’t have an 85C warming filter, you may be able to colour-correct your CineStill 800T frames shot in daylight that appear to have an undesired blue/teal overcast.
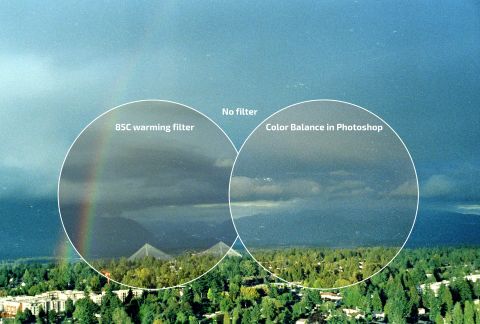
The image above demonstrates the best-case scenario: I had a reference frame shot with an 85C warming filter right next to the working (no filter) scene. I used the reference to create matching colours with adjustments via Adobe Photoshop’s Color Balance tool.

Starting with the Midtones mode, I shifted my sliders away from Green towards Magenta, from Cyan towards Red, and from Blue towards Yellow. Once my adjustments made the image appear close to the reference, I moved on to Shadows and Highlights, returning to Midtones occasionally to fine-tune the results.
However, colour correction is more difficult without reference material, even more so when you are working on an unfamiliar scene.
Without a Macbeth chart — a set of physical colour swatches that you can photograph and then use as a reference for easy colour correction — you’re stuck with what you’ve got.
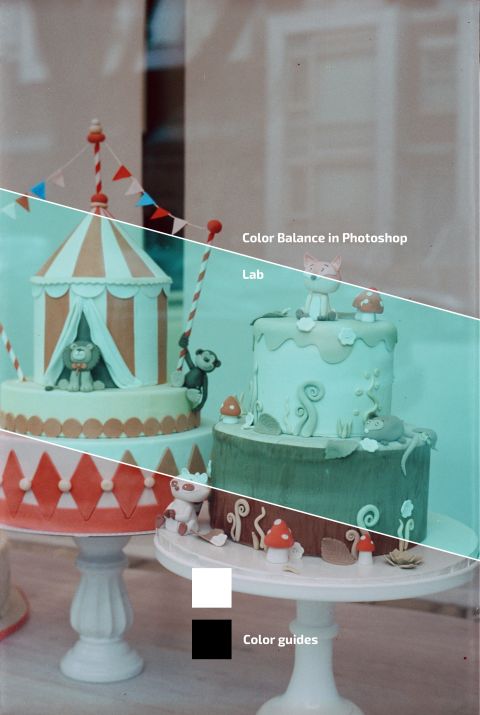
If lucky, your scene will have elements that you know should appear white, grey, or black. Taking care of colour casts, in this case, can be done using Photoshop’s Color Balance tool to alter the image so that its grey tones appear natural.
I often create a new layer with pure white and pure black swatches of colour to help me quickly reference how those tones ought to look in the end.
You can speed up this process with the Curves adjustment layer that has image sampling pipettes (to the left of the histogram) which you can use to pick the white, grey, and black points in your photograph. The software can then use those reference points to automatically colour-correct your image. However, I still prefer the precise, granular control and the interface of the Color Balance tool.
Mixed lighting and images with complex colour patterns (no clear white/greyscale elements) can make colour corrections frustrating and time-consuming. This is why I would again recommend an 85C colour filter to simplify things and save time.
About white balance and colour temperature.
Tungsten-balanced stocks exist because of film’s baked-in colour balance that can’t adapt to changing lighting. Typically it’s daylight-balanced, but Tungsten stocks let us shoot under artificial lighting and get results that are vastly superior to the regular colour films.
Human vision can recognize a sheet of paper as white regardless of the colour of light that falls on it. We know it’s white in daylight, still white when an orange light from a candle illuminates it, and yes, it’s still white when lit up by the cool blue shine of a fluorescent light bulb. But to a light-sensitive emulsion, these are all different colours.
Most colour film sold is daylight-balanced which means that it’ll render a piece of paper white under the sunlight (5500°K). Tungsten-balanced films made for shooting in artificial light, on the other hand, render a piece of paper correctly under the warm (3000°K) glow of tungsten light.
Colour temperature is used to define and measure various light sources’ colours on the spectrum from red to blue. It is measured in degrees Kelvin which is the temperature a perfectly black object needs to be heated to in order to glow a certain colour.
For example, 5500°K is very close to the sun’s photosphere’s 5800°K. Tungsten lights glow orange at 3000°K, which is similar to the temperature found on the surface of red dwarfs, and LEDs can glow blue at nearly 7000°K, which is similar in colour to the ultra-hot blue stars.
Interestingly, an overcast day’s sunlight measures nearly 7000°K, just like an LED or a blue star. While the clouds certainly didn’t make the sun hotter, the light that it gives off after being filtered through the atmosphere appears bluer.
You can learn more about tungsten-balanced stocks in my in-depth review of the CineStill 800T film stock.
❤ By the way: Please consider making your CineStill 800T, 85C warming filter, and Macbeth chart purchases using the links above so that this website may get a small percentage of that sale — at no extra charge for you — thanks!