A Beginner’s Guide to Push & Pull Film Development
11 min read by Dmitri.Published on . Updated on .
In this short guide, you’ll learn about box speed and ISO, what it means to push or pull film, and how to do it at home.
In this guide: What is a box film speed? What is a DX code? What is an exposure index? What does it mean to push film? What does it mean to pull film? Why would one want to push or pull film? Push or pull film development at the lab. Push or pull film development at home. Which films work best with pushing and pulling? Which developers work best with pushing and pulling film? Support this blog & get premium features with GOLD memberships! ☝︎ Further reading: “Pushing Ilford HP5+ to ISO 100,000” and “Pulling Ilford HP5+ to ISO 3.”
What is a box film speed?
Film ISO, a.k.a box film speed, is determined by the manufacturer to inform camera exposure and development.
Box film speeds are usually calculated using scientific measurements and a formula. However, they can sometimes be based on the practical experience and opinions of photographers who tested the film before it was packaged.
“Box speed” comes from the number printed on the film package (i.e., the box). The word “speed” is a general reference to film sensitivity, which is typically marked as an ISO number but could also use older systems, such as DIN and the Soviet GOST.
What is a DX code?
A DX code is a strip of metal on the side of a 35mm film canister painted with black squares to form a code that film cameras can read. DX code stores the film’s box speed ISO value.
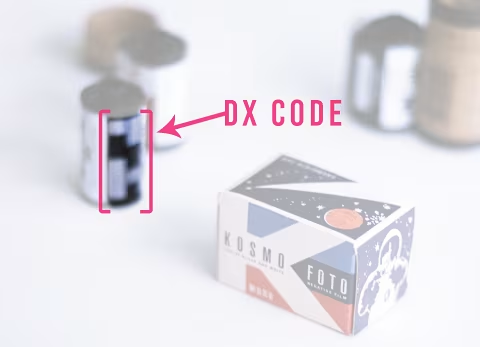
It has some similarities to QR codes in that it encodes information using a checkered pattern, but the data DX code carries is much simpler. There are guides on the internet that can help you hack your DX code to alter its ISO value — this is useful if you are using a point-and-shoot camera and would like to push or pull your film.
Not all film cameras can read DX codes. This system was invented in the 1980s to simplify the photographic process for automatic exposures. It became particularly popular on point-and-shoots which make photography quick and easy.
Some film cameras will allow you to overwrite the film ISO, but most point-and-shoots do not, which presents a problem for using bulk-loaded film or film in plastic film cartridges.
If your camera does not let you overwrite the DX-coded film ISO or if it does not have exposure compensation settings, you will need to hack your DX code to push or pull your film.
Note that if your film cartridge does not have a DX code and your camera has no way to set ISO, it will default to either ISO 100 or ISO 25 — you will need to check that camera’s review or manual to know which one it will be.
What is an exposure index?
Box film speed/ISO isn’t the only way to meter your exposures. You can assume it to be higher or lower (for the entire roll) and then develop accordingly. When you assume something different from the box, it’s a convention to use/say EI instead of ISO. EI stands for exposure index. So, if you shoot Kodak Tri-X, which has a box ISO of 400, as if it were an ISO 800 film, you are shooting it at EI 400.
ISO isn’t meant to change for any film as it’s calculated using a specific formula or determined by user tests as a film speed that would produce the most optimal or consistent results. Thus, diverging from this number means you are no longer using ISO or a different exposure index (whereas ISO could be thought of as a default exposure index).
What does it mean to push film?
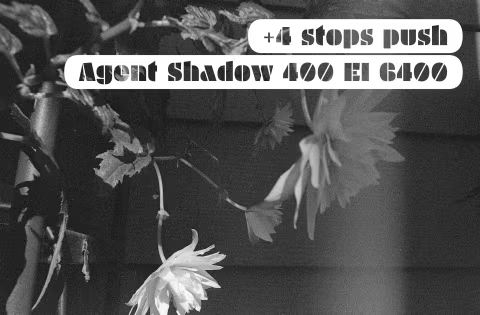
Pushing film means setting your exposure index higher than the ISO while shooting then increasing the development times. For example, if your film’s box speed is ISO 200, you can push it +1 stop by metering your film at EI 400 and then developing it for a longer time. I will cover the development times for home processing below. Alternatively, you can ask your lab to push your film.
Camera settings. When exposing film, you will need to either increase your shutter speed (e.g., 250 instead of 125), or set a higher f-number on your aperture (e.g., 𝒇16 instead of 𝒇11), or set your camera’s exposure compensation dial to -1, or change the film ISO higher (e.g., 400 instead of 200) to push film by one stop.
Limits to pushing film. You can push your film one or more stops, but it’s rare to push film more than three stops. Pushing film will often increase the contrast and graininess of your images. Various films will respond differently to being pushed — some will tolerate three stops without much degradation, while others can become too grainy to be useful. Good film reviews will often mention how well a film will respond to being pushed.
☝︎ Further reading: “Pushing Ilford HP5+ to ISO 100,000.”
Unlike colour-negative films, black-and-white films can have various developers and developing techniques, which can affect the quality of pushed images. I will list a few options for black-and-white film developers most suitable for pushing film below.
✪ Note: If you change the exposure index (e.g., using 𝒇16 instead of 𝒇11 that your light meter suggests or changing your film ISO setting to differ from the box) without changing the development times, you are underexposing your film — in this example, by one stop.

What does it mean to pull film?
Pulling film means setting your exposure index lower than the ISO while shooting and decreasing the development times. Essentially, pulling film is the opposite of pushing film.
Camera settings. When exposing film, you will need to either decrease your shutter speed (e.g., 60 instead of 125), set a lower f-number on your aperture (e.g., 𝒇8 instead of 𝒇11), set your camera’s exposure compensation dial to +1, or change the film ISO lower (e.g., 100 instead of 200) to pull film by one stop.
Limits to pulling film. You can pull your film one or more stops, but it’s rare to pull film more than two stops. Pulling film often decreases contrast and may also increase the grain size. As with pushing, various films and developers will respond differently to the process.
☝︎ Further reading: “Pulling Ilford HP5+ to ISO 3.”
✪ Note: If you change the exposure index (e.g., using 𝒇8 instead of 𝒇11 that your light meter suggests or changing your film ISO setting to differ from the box) without changing the development times, you are overexposing your film — in this example, by one stop.
Why would one want to push or pull film?
Changing light conditions may require you to push or pull film. For example, if you’ve got an ISO 50 film and are expecting to have a photoshoot in bright sun, you may suddenly need an ISO 200 film if the clouds unexpectedly cover the sky. Should that be all you’ve got, you can set your light meter to ISO 200 and then ask the lab to push your film +2 stops.
Shooting in subdued light without flash (especially when it comes to colour film) will have you pushing your film as well. For example, if you’re planning to shoot during the blue hour (an hour after the sun sets), an ISO 800 film may not be enough; unfortunately, that’s the fastest colour film in production, and thus, you’ll have to push it one or more stops to get usable images without having to use a tripod.
Shooting fast action that needs the fastest shutter speed will often also need a fast emulsion, and the current selection of films may not be adequate. Pushing your film can solve that limitation.
Using film with infrared and some colour filters sometimes calls for an ISO much higher than the box. When it comes to infrared, the options are limited; thus, pushing your film is the only way forward unless you’re willing to mount your camera on a tripod.