How to Make Perfect Exposures on Film
12 min read by Dmitri.Published on . Updated on .
Mastering your exposures will give you consistently better results, especially if you shoot film. You will add fidelity to your images and get better control over your colours and contrast. There will also be less work for you to do in post-production to get the desired results.
This guide to perfecting your exposures covers advice for both manual and point-and-shoot film cameras.
In this guide: What is a perfect exposure? 18% middle grey. Reflective light meters. Incident light meters. Sunny 16. Metering for shadows. Exposure compensation techniques. Identifying underexposure and overexposure. Underexposure and overexposure side-effects in film photography. Steps for creating your perfect exposure. Support this blog & get premium features with GOLD memberships!
What is a perfect exposure?
A perfect exposure captures the light in the exact way you’ve envisioned. An example of such an exposure is a photograph you find no reason to edit after scanning as it looks precisely the way you want it to. Personal preference is a factor.
Exposure, in this context, is limited to the amount of light your film receives — we are not talking about composition, blur, etc.
✪ Note: A normal exposure, which I define differently from perfect exposures, is discussed in detail below.
If your exposure isn’t perfect, you may still tune it to your needs after scanning your image with tools like Photoshop or Lightroom. The same goes for printing in a darkroom. However, the amount by which you can alter your exposures in post-production will depend on the film, the scanner, the printer, and the paper the image is being printed on.
In some cases, you may be able to change your image significantly without noticeably degrading its quality. But all images will lose some detail as you alter their brightness.
Now that we know what the objective is, let’s consider a few technical definitions and tools for measuring and understanding light.
18% middle grey.
Middle grey is the shade we identify as halfway between the darkest and the lightest colours in a scene.
A series of experiments determined that a point on a greyscale gradient strip that reflects 18% of the light is seen by most as middle grey. This finding has a significant implication for photography. It is foundational to the science of colour perception and is applied in image processing software, screen, print, film, and digital sensors.

Reflective light meters.
Your camera’s reflective light meter works by measuring the 18% middle grey point’s lux output. It finds the middle grey point by calculating the geometric mean of all the light reflecting off your scene within its range. Most of the time, that works. However, there are cases when a meter will falter.

The most common way reflective light meters fail is when they are pointed at a backlit subject. In this scenario, most of the scene is lit up by intense light while the (darker) subject of interest is relatively small. As a result, most meters will bias their readings to create optimal exposures over the largest (brightly lit) area, leaving the subject as a dark silhouette.
In fact, this happens so often that many film cameras with built-in light meters have a dedicated button meant to correct the exposure readings for this situation.
✪ Note: Another way to solve the backlit subject problem is via fill flash, which lights up the subject to match the bright background.
A spot meter is a reflective light meter that takes measurements from a small area of your frame. To get a light reading, you’d point it to a spot that you’d like to appear as middle grey in your image. Most of the time, it’d be something like a light-coloured leaf or asphalt pavement, though a more precise reading would be from a grey card (a piece of paper or another material that reflects about 18% of light) placed next to your subject.
Some cameras will have a combination of both types of reflective light meters. Others will weigh several light sensors’ outputs and bias their measurements towards the middle of the frame. Some digital cameras will attempt to find faces and bias light measurements toward their tone.
Though the above and many other available technical solutions tend to improve the success rate of light measurements, there are still situations when a machine will fail to capture the photographer’s intent. For example, you may want to take a picture where your backlit subject appears as a black silhouette, but your “smart” light meter attempts to “correct” that, going against your wishes.
Incident light meters.
Incident light meters are another type of a light meter that guarantees a correct middle grey reading as long as you place it next to your subject. It works by measuring the incoming light rather than reflected light.
However, you may not always have an opportunity to walk up to your subject and take a reading with your fancy light meter.
Sunny 16.
You can also estimate your exposure measurements without a light meter using the Sunny 16 rule:
Under full sun, correct exposure is set by dialling your shutter speed to approximately 1/ISO and aperture at 𝒇16.
For example, if you’re shooting ISO100 film in full sun, your aperture should be 𝒇16 and shutter speed — 1/125s.
Though the Sunny 16 rule works only under the full sun, with practice, you may be able to estimate your measurements under various light conditions. For example, you may remember that a light shade is about three stops darker than a sunlit scene and thus would call for 𝒇5.6 aperture (-3 stops) and 1/125s shutter with an ISO100 film.
Learn how to accurately guess exposures without a light meter using the Sunny 16 rule.
➜📱 Sunny 16 Calculator — A free app I built to simplify exposure readings with the Sunny 16 rule. It has visual illustrations for 12 light conditions with an easy way to adjust your camera settings without altering the EV.
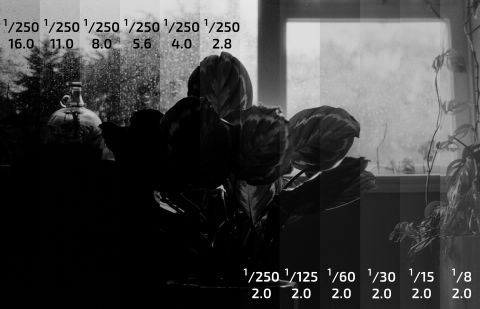
Metering for shadows.
Film negatives have more exposure latitude in highlights. This means that you are less likely to get harsh gradient transitions and loss of colour information in your images’ bright areas than in the shadows. You will also get better results fixing images that are too bright than those that are too dark.
Because of that, it is often advised to err on the side of overexposure while shooting with negative film.
As you may recall from the above sections about reflective light meters, those devices will look for a middle grey point by calculating the geometric mean of all the brightnesses in the scene. And so, when you point them towards the darker areas, their calculations produce readings conducive to brighter exposures.
This effect is more pronounced with spot light meters as they have fewer shades to average their reading over.
Essentially, pointing your light meter towards the darker areas of your scene increases your future photograph’s brightness and ensures that your shadows have more of their details preserved.
✪ Note: Slide or reversal film does not work that way; thus, you should avoid metering for shadows with these emulsions.
Exposure compensation techniques.
Exposure compensation means altering light meter readings for a particular purpose.
For example, your camera’s backlit subject mode is an exposure compensation tool. It works by adding +1.5 or +2 stops of exposure to the built-in meter readings.