Can You Scan Film Without Changing Its Look?
And Other Film Digitization Questions Answered
12 min read by Dmitri, with image(s) by Betty and Daren.Published on . Updated on .

The opaque nature of scanning software makes comparing film stocks and understanding the results of different exposures, colour filters, and film brands unreliable.
There’s no “unedited” film look if the app that inverts your film negative applies hidden transformations that affect its colours and contrast.
Because of that, it can be difficult to tell whether a particular effect on scanned images results from a chemical process or computer-generated filtration. Worse yet, a misguided (but common) assumption that software can change all key properties of images, including making digital photos look like film or certain film stocks to resemble others, can make using film feel pointless. Thankfully, that is not true.
This guide introduces a technique for consistent and predictable film negative inversion. This technique uses all available image data, does not affect colour balance or saturation, and retains natural contrast with few exceptions.
The guide also answers a few questions about scanning film, starting with an explanation of why it may not be possible to create an image from a film negative without interpreting/changing the colours, whether one film stock can be digitally edited to look like another, what may be the technical advantage of shooting film if it’s going to be scanned with a digital camera, and whether it’s possible to tell if an image was shot on film or digitally.
In this guide: If film is scanned digitally, does it lose its authenticity? Is it even possible to tell if something was shot on film? Is it possible to identify the film stock an image was shot on? How can shooting and scanning film be technically advantageous to shooting digitally? Can one film be digitally altered to look like another? How to scan film without changing its look. Support this blog & get premium features with GOLD memberships!
If film is scanned digitally, does it lose its authenticity?
Once a physical medium is scanned, it becomes a digital image. In the case of film negatives, this image has to be inverted in a way that compensates for the orange mask, perhaps have its colours corrected and dust/scratches removed. The photographer could also crop the image, make further adjustments, or even mix the mediums by printing again and incorporating it into other artworks.
Process aside, the value of using film as a capturing medium in a digital pipeline that transforms the original image so drastically may seem unclear. Though it was shot on film, the image is no longer analogue as it is digitized.

Or is it?
Let’s consider the darkroom printing process, which is commonly understood as purely analogue and perhaps even an ideal way to obtain images from film negatives.
Darkroom printers rely on paper, light, and developer chemistry to enlarge and invert film negatives, compensate for the orange mask, correct the colours, and use brushing/handling techniques to minimize dust and scratches. The result is a piece of paper with an image made from different materials, dramatically altered compared to the original.
Whether we’re viewing a photo shot on film on a monitor or paper developed in a darkroom, it is just a copy — flawed and altered.
Consider the famous work of art by René Magritte¹, commonly known as “This is not a pipe.” It is a thought piece pointing out that while we are looking at an image of a pipe, it is not, in fact, a physical manifestation of the object in question. Yet, we still recognize it as one.
Thus, if we were to limit our definition of authenticity to strictly seeing images on film without alterations, we’d have to discard all printed photographs ever created, even projections made from slide positives, perhaps even instant photos (since developed instant photos are a positive made of a negative we either discard or do not see).
Given that we may not have literal authenticity in a printed or scanned image, we should instead consider how well the reproduction depicts the original medium. If it looks like a pipe, it’s the best we can do. In other words, if we can tell that an inverted scan looks like it was shot on film, that may be all the authenticity there could ever be.
¹ — Image retrieved on Mar 23, 2025, from Wikimedia Commons.

Is it even possible to tell if something was shot on film?
If we can tell that an inverted scan looks like it was shot on film, that may be all the authenticity there could ever be. Can we?
Whenever someone asks to guess which of the photos they posted is film and which is digital, I jump at the opportunity. So far, I’ve answered 100% correctly. And that’s when comparing images meticulously edited to look identical with some of the best film simulation tools.
If the resolution is enough to see the grain, it’s usually easy to tell. Digital grain simulations paint dark blotches, which often dims the bright areas but doesn’t affect the shadows with enough variation. Real film grain interacts with the image on a deeper level — fading or becoming smaller in the highlights and producing complex textures throughout the image’s surface.
Small imperfections like dust and scratches are another giveaway, and so are development imperfections.
Special sensitivity can make certain films easy to identify and impossible to fake completely. For example, Aerochrome is an infrared-sensitive colour film that renders foliage red, but its effect is far beyond turning greens into reds (real-world greens appear blue on Aerochrome, so you can’t simply change the reds to greens to get this look). And even when the colours of Aerochrome are simulated with infrared-sensitive digital sensors, the digital effects look more orange/less pink in relation to the middle grey, and the images show less contrast — even with very expensive physical lens filters.
Despite its undeniable powers, digital technology does not offer unlimited freedom. If you move your colour slider in a direction, this will often alter parts of an image you haven’t anticipated. Extreme colour changes can throw contrast out of whack and introduce other artifacts. Separating parts of an image into layers and stitching everything back together creates its own problems.
The words “fix it in post” became a meme because changing colours and other aspects of an image is limited and challenging with modern technology, even if it may not seem that way. I say this as someone who wrote a course on colour correction and wrote software that uses computer vision to invert film negatives.
Of course, low-resolution images can be hard or impossible to identify as film or digital. Certain films render grain very finely, and larger formats can also conceal texture.
Curiously, faking the medium isn’t new. Photorealism is an art genre and a movement concerned with making drawings and paintings look like photographs.

Is it possible to identify the film stock an image was shot on?
Sometimes, it can be easy to guess the film an image was shot on. For example, there’s just nothing else out there like Aerochrome. But that’s not necessarily the case with all films, and it depends on how you examine your images.
Last year, I built a game that, using community-submitted photographs, asked the player to guess the film a black-and-white image was created with. It’s called What The Film?! and it was featured on a few blogs and podcasts, including PetaPixel. The game had hundreds of players whose answers I’ve analyzed and published in an article titled “Photographers Are Terrible at Identifying Most B&W Films.”
WTF?! players used various screens to examine the samples scanned using various scanners and software/settings. Many participants told me they would have a much easier time identifying films if they controlled how they were scanned and/or printed.
Indeed, detailed, consistent scans with sufficient resolution can reveal minute differences between film stocks — even when edited to look identical. This is the conclusion I came to when looking and Kodak Gold vs. ColorPlus and then again while comparing modern ISO 800 colour stocks.
But even when I could demonstrate those differences, they failed to convince some photographers. Admittedly, they are very slight. Combined with the fact that we’re lucky to have dozens of modern film stocks to choose from, it’s unlikely that anyone — let alone a casual viewer — could correctly identify the film an image was shot on every time.
Exceptional films, such as Aerochrome, will always stand out. Seasoned photographers will also find more colour variation and better reproduction in modern films such as the Kodak Vision 3 and Portra series over cheap stocks like Kodak Gold (provided that the scans are detailed enough). But telling one black-and-white film from another can be more difficult.
The differences can be nearly imperceptible, non-existent (as is the case for rebranded films when compared to an identical other-named stock), or they can be extreme. It’s a range, the kind you’d expect to see from other finely-variable goods like wine, tea, and rice.
How can shooting and scanning film be technically advantageous to shooting digitally?
I prefer shooting film for many reasons, but in this article, I’d like to stay laser-focused on scanning. Given that transferring an image from the analogue medium inevitably requires significant changes and some distortions to the original, it may seem like we’re wasting precious image data compared to the more straightforward act of capturing digital information on a sensor. However, that’s not entirely true.
Let’s consider the Aerochrome film again. It’s sensitive to infrared light, which most digital cameras simply can not capture. However, once developed, it becomes an image embedded in the emulsion that no longer requires infrared sensitivity from the scanner or the digital camera that scans it. In this example, the film encoded invisible light into readable data, which would not be possible or easily obtainable when shooting digitally “directly.”

In our next example, let’s look at Kodak Portra 800, a film with an incredible 12.5+ stops of dynamic range. This means that it can capture more shadow and highlight detail simultaneously than any other film. In fact, it can capture more of those details than most digital cameras. Yet again, developed and scanned, the image on the negative does not need the scanner to have more than just four stops of dynamic range. In other words, film can “see” the world in greater detail than a digital camera scanning it; meanwhile, all that detail is available in the scan once it’s inverted.
In a way, film is similar to the digital camera RAW format as it compresses dynamic range and encodes light it’s sensitive to in a colour dye layer readable by scanners or transferrable to photo paper (which may have a much narrower dynamic range and ISO).
☝︎ Further reading: “Future-Proof Your Film Scans With Digital Negatives.”
Can one film be digitally altered to look like another?
Given how hard it could be to tell certain films apart, you may not even need to do any work to conceal your stock’s origins. But just because it may be hard to tell films apart in certain scenarios doesn’t mean it won’t become apparent in others.
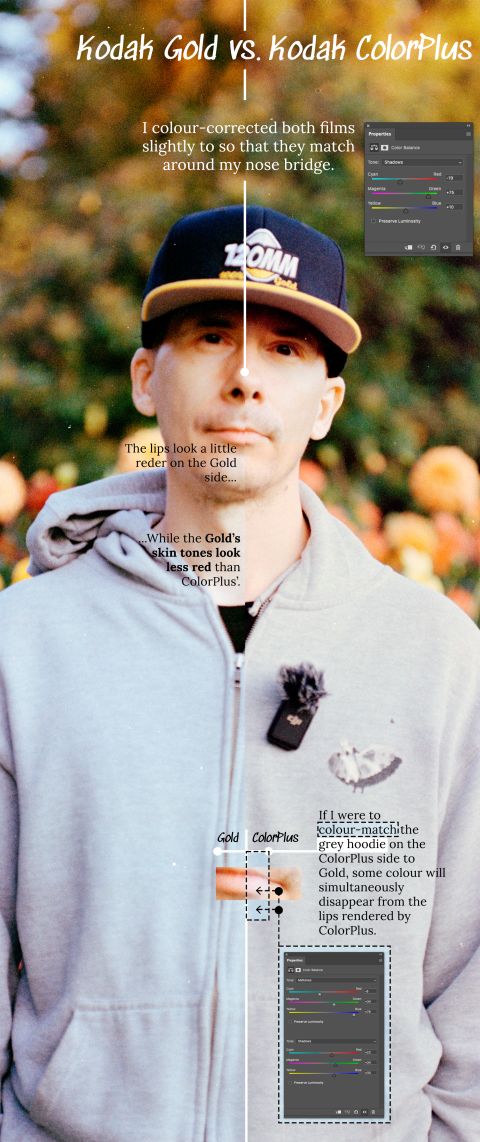
For example, cheaper emulsions like Kodak Gold are often compared to and sometimes placed above Kodak’s expensive Portra films. Gold is cheap and easy to scan. Both films produce similar colours when photographing inanimate objects and foliage in bright sun. But if you were to make portraits or take photos in tricky lighting with the intent to produce detailed scans, Portra will show more tonality and retain more information in shadows and highlights.
The example image above compares two cheap films: Gold and ColorPlus. Gold appears to render one more recognizable colour shade for my skin than ColorPlus, but overall, even with a detailed scan, my face is painted the same shade of yellow no matter where you look. Compare that to Kodak Vision 3 250D — a modern film stock used by motion picture studios (below). Vision 3 renders clear distinctions between the pink areas around my nose, the gray stubble, and the complex tone of my skin lit by the setting sun. There’s a lot more colour variation that can’t be extracted from the cheaper films because it’s not there.
Of course, there’s a range of possibilities here also. Reduce both images’ resolution to a pixelated mess, and there won’t be delicate shades of colour to notice.

How to scan film without changing its look.
Scanning and printing film inevitably alters its visual properties — but it’s never a complete rewrite of the image’s DNA. In many cases, it’s easy to tell when an image is shot on film and with enough effort and consistency, we can reliably compare film stocks.
A darkroom printer who controls their process could tell the difference between films better than someone who picks up their photos from a different lab every time. Unfortunately, modern film scanning software removes control from its users by obscuring the algorithm responsible for the inversion.
To regain that control, we must understand how digital film inversion works and pick a method that preserves as much information about the medium as possible.
Histogram stretching (a.k.a., normalization) is the best way for predictably inverting film negatives. It’s simple to understand and replicate with advanced image editing software. It does not affect colour balance other than realigning the three colour channels to counter base fog and the orange mask.
Histogram stretching helped me evaluate dozens of films on this blog with confidence. With the help of this tool, I could describe them for what they are instead of deferring to marketing material or needing to warn the reader that they may not be able to replicate my look in their own workflow. If you want to see colours like mine, use a good scanner, invert your film using histogram stretching, and follow my tips for correcting the colours.
Better yet, use film Q.
film Q is an app I built specifically for rendering consistent negative conversions in batches with minimal effort. It’s currently the only app that openly and plainly explains what it does to your film. I used it with most of this blog’s images, including everything in this article and advanced film comparison experiments.
film Q is free to try and comes with many perks, like monthly exclusive articles, software for tracking film rolls across your cameras, developer expiration calendars, and more.