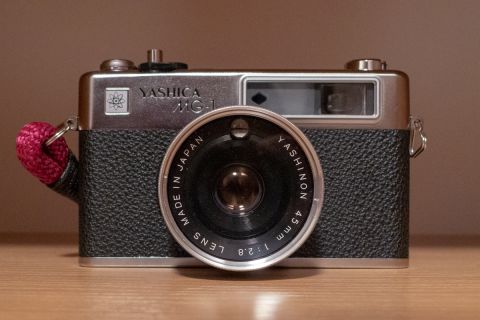
Yashica MG-1
10 min read by olli thomson.Published on . Updated on .
Last year, while exploring the new-to-me world of 1970s rangefinders, I regularly came across enthusiastic endorsements of the Yashica Electro 35. That general enthusiasm was reflected in the prices of these cameras which sold for considerably more than I wanted to pay. One day, while browsing Used Photo Pro I came across a Yashica MG-1. It looked like an Electro 35 and even had the distinctive Electro badge but it did not carry the Electro name. It was also in my price range at, as I recall, $22.
A quick online check revealed that the MG-1 was essentially the “poor man’s Electro 35.” That was good enough for me, and I placed my order. When the camera arrived I was pleasantly surprised at its excellent cosmetic condition. All appeared to be working normally mechanically but I decided to send it for a CLA nonetheless.
The work was carried out by a guy named Mark, who trades on eBay as iphoto*. He seems to have turned his hobby of fixing up old Electros into a business. The camera came back looking like it just came out of the box. In addition to servicing and cleaning everything, he also supplied a battery adapter with a new cell and an original Yashica 1A screw-in filter. If you have any variant of the Electro 35 and are looking to have it serviced. I’m happy to recommend Mark.
Now that I had my pristine MG-1 I loaded up some film and headed out… No I didn’t.
That’s what I should have done. Instead, I put it on a shelf and left it there with the intention of taking it for a run at some point. Then I moved halfway across the world and the Yashica spent three months on various trucks and ships catching up with me. When it finally arrived I put it in a cupboard with my other cameras and sort of forgot it was there.
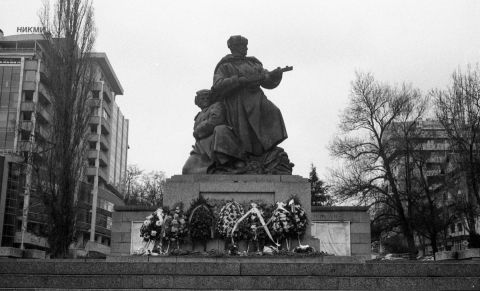
Then Jim Grey posted his revised review of this camera and I thought to myself, “I’ve had one of these for nearly a year and never yet used it. That’s not good.” So a couple of Fridays ago, on a grey, damp day in Sofia, I finally loaded a roll of film and went for a walk.
The first thing to be said is that this is a big lump of a camera weighing in at 620g or 1lb. 6oz. That’s heavier than my FM2n body which is 540g. Add the closest equivalent Nikon lens, the 45mm f2.8 AI, and that takes it up to 660g, not much more than the Yashica. Still, I don’t mind the weight since it gives the camera a sense of solidity that some of the more compact rangefinders, like my Konica C35, lack.
MG-1 is a simple camera to use. Like the rest of the Electro 35 range, it’s an aperture-priority camera. Since I use aperture priority most of the time, this was one of the main attractions for me. Most rangefinders of this era that offered any degree of control were shutter priority only. If you’re looking to take more control — you are out of luck. There is no manual option, but, personally, I can’t imagine ever wanting to shoot a camera like this in manual mode, so this isn’t an issue for me. There is a flash mode that is selected via a lever on the top plate. Since I don’t use flash with my film camera,s I never bother learning how flash works on any of them.

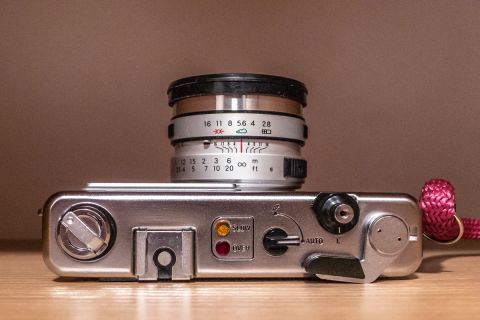
The aperture range on the 45mm lens is from f2.8 to f16. This is one of the main differences between the MG-1 and the Electro 35s — which all have a 45mm f1.7 lens. Presumably, the slower lens was one of the ways Yashica kept the price down on the MG-1.
In addition to the aperture numbers, the aperture ring is also marked with symbols – a window, clouds, and the sun. The ring only has click stops for the symbols, not the numbers. I think this was a feature common to the whole range and is a reminder that while today these are niche cameras for film enthusiasts, in their day, they were made for the masses. Between 1966, when the first Electro 35 was introduced, and 1980, when the MG-1 ceased production, Yashica sold eight million Electros.
The film speed is set by holding and moving a small lever on the bottom of the lens. Available speeds are from ISO 25 to 800 and these can be adjusted in 1/3-stop increments. Once your film speed is set, all that remains is to choose your aperture.
The MG-1 has a remarkable “no-information” viewfinder. There is, quite literally, no information displayed. If you want to know what aperture you have chosen you need to look at the lens. If you want to know what shutter speed the camera has chosen, tough. Yashica decided you didn’t need to know that at all.
What the viewfinder does have is two illuminated arrows at the top. On the left is an arrow pointing right that lights up in red; on the right is an arrow pointing left that lights up in orange. The manual says this lights up in yellow but its the orangiest yellow I’ve ever seen, so orange it is. These coloured lights are replicated on the top plate but here they are simply round lights rather than arrows.
The idea behind these illuminated arrows is quite simple and elegant. The camera’s maximum shutter speed is 1/500th. If your chosen aperture combined with your film speed would require a shutter speed in excess of 1/500th for correct exposure, then the red arrow lights up on a half-press of the shutter release to warn you that your shot will be overexposed. It points to the right because you need to turn your aperture ring clockwise to select a smaller aperture. Do this, then try another half-press. Keep going until the red arrow no longer lights up. Eventually, the required shutter speed becomes on or below the camera’s 1/500th maximum.
If, on the other hand, your chosen aperture combined with your film speed would require a shutter speed of 1/30th or slower, on a half-press of the shutter, the orange arrow lights up. It warns you that you are entering camera shake territory. In this case, the arrow points to the left because you need to turn the aperture ring counterclockwise to choose a larger aperture. The camera can then choose a faster shutter speed. Again, keep turning the aperture ring and checking until the orange light no longer comes on. At that point, your shutter speed is back on the safe side of that 1/30th mark.
The exposure indicators are a simple and elegant idea and generally work very well. I found that sometimes the arrows are not easily visible when holding the camera vertically but a slight adjustment of my eye in the viewfinder usually resolves that. The lights on the top plate function in the same way; the red light has an inscribed over beside it, and the orange light an inscribed slow. Not entirely sure of the point of having the lights on the top plate since I’m can’t see why you would be making these adjustments without your eye to the viewfinder.
I do wish that there was an indication of the shutter speed in the viewfinder since there is no way to know if you shutter speeds are fast enough to stop movement or slow enough to create deliberate blur. Metering is controlled by a CdS cell located in the lens assembly just above the front element. It will automatically compensate if you are using filters.
As I was wandering around shooting with the camera, one of the features I found most impressive was the smoothness and consistency of the film wind lever. The resistance is just right and it maintains the same friction throughout each frame of the film. I use the camera with a wrist loop; it is simple to wind one-handed with the camera by my side.
The camera has a shutter lock around the shutter release which can also be operated with one hand. The shutter release itself travels a long way before the triggering. Since the camera has a leaf shutter built into the lens, it is extremely quiet. Just a gentle click to let you know that the picture has been taken. Winding on produces another, louder, click — or clunk — which is exactly what is supposed to happen. These cameras are known to suffer from a problem with the winding mechanism when a small pad that is part of the shutter release system gets worn away. As long as you can hear that click/clunk you know you have a good pad.
I did have one winding mishap when I accidentally took a double exposure. Since there is no double exposure control on the camera, the only way to achieve this is by pushing in the film rewind button on the bottom of the camera and winding on. It seems that I did this without realizing it. Thankfully, when I wound on for the next shot the mechanism re-engaged and the rest of the frames were exposed normally.
The viewfinder has the usual bright lines for framing, but unlike the Electro 35s, the MG-1 frame does not automatically adjust for parallax error when close focusing. Instead, there are additional parallax correction marks within the bright frame. The rangefinder spot on my camera is a very distinct yellow-orange but instead of the usual rectangle, the spot is more of a diamond shape for reasons unexplained. I found the diamond harder to work with than the traditional shape and discovered afterwards that on a number of shots, my focus was a little off. Though I expect this is mostly just my lack of practice rather than any problem with the rangefinder itself.
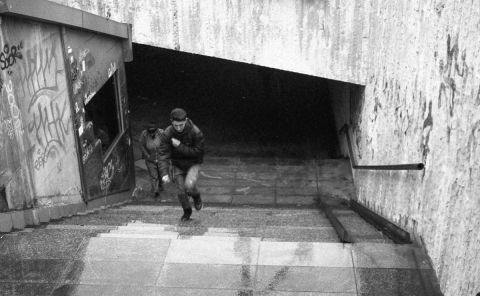
I worked my way through the 36 frames of Tri-X in two or three hours while testing the camera and found it very pleasant to use. The camera’s simplicity is its strong suit. While still allowing me a degree of control for the most part, there’s very little to adjust and very little to think about when using the MG-1. To my surprise, I discovered that I like working with this big chunky camera more than my compact Konica C35 or Auto S3.
I’ll be keeping the MG-1. I doubt it will see regular use but I can imagine taking it out from time to time just for the fun of it.
For $22 it’s an absolute bargain.