How to Test Your C-41 Film Chemicals
Avoid Disasters and Maintain Quality Results With a Simple Snip Test
4 min read by Dmitri.Published on . Updated on .

Developing film with chemicals is like cooking: you must measure everything and apply a technique. But sometimes, you also have to check if what you’re cooking with is still good.
There are many ways to identify expired food (i.e., smell), but when it comes to film, there’s a process you need to follow to verify if your chemicals will develop your images and not ruin them. Thankfully, there are shortcuts to help you do this quickly.
The C-41 colour-negative process is the simplest way to develop film at home. But it can still fail if the chemicals are exhausted or expired. Depending on how many rolls of film you develop at once, this can spell disaster (blank rolls) or gradual quality degradation that you can only spot after scanning your first frame.
A snip test is a simple and quick way to spot issues with your chemicals. There are a few ways you can perform it, depending on the degree of confidence you’re looking to get. The simplest method requires minimal setup and can be done in a fraction of the time it takes to develop your film.
In this guide: Avoid developing your film with expired chemicals. How to test C-41 film developer. How to test your blix chemicals. Support this blog & get premium features with GOLD memberships!
Avoid developing your film with expired chemicals.
Snip tests are great for disaster prevention, but they don’t tell you how active your developer is or how fresh your bleach is. They will only tell if your chemicals work or not.
Chem Log is an app that can help you keep a diligent record of your chemicals and your film so that you can have a clear understanding of how fresh your chemistry is.
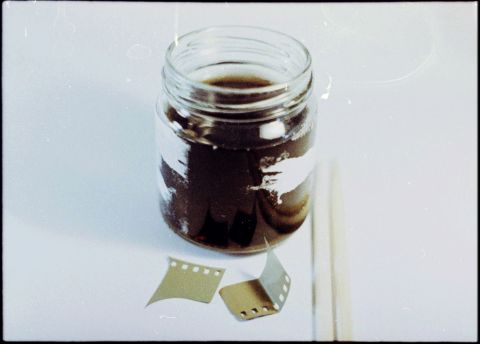
How to test C-41 film developer.
Setting up a water bath, warming the chemicals, drying film, and scanning can take a while. Thankfully, you don’t need to do any of these to check if your developer works.
The simplest way to test your C-41 chemistry is to pour some developer into a clear jar or a cup and drop a small piece of fresh film in it. There’s no need for a light-tight tank — a snip test should be done in daylight. Typically, you can snip/clip a piece off the end of your freshly-exposed roll (as you would anyway before loading it in your Paterson tank).